户外GPS定位机器人的定位和建图的仿真实战(上)
https://mp.weixin.qq.com/s/J1Z0HE7ngroc2LWw-8ajiw
根据《轮式自主移动机器人编程实战》第10章的内容,本教程继续深入做个讲解,该教程主要是探索和验证:在没有高精度地图的情况下,实现精度不高的定位和导航。
弱化高精地图带来的影响。
基本思路:
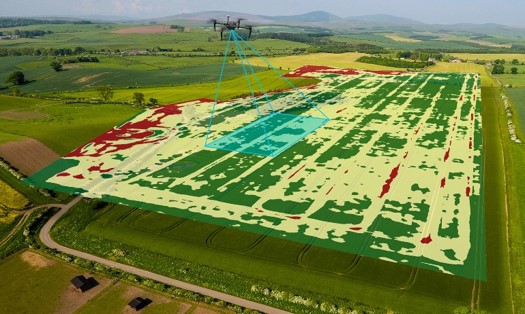
这里采用全球定位系统采集绝对位置,然后构建合适的道路网络,有了合适的全局道路网络地图便可以使用A*算法在构建道路网络上规划路径。机器人终端依靠规划的全局路径信息和局部避障算法重新规划局部路径,在精度要求不高的情况下,使机器人终端到达目标点。
而在道路上行驶则需要依赖多种传感器完成避障决策、局部路径规划等任务。
 图片
图片
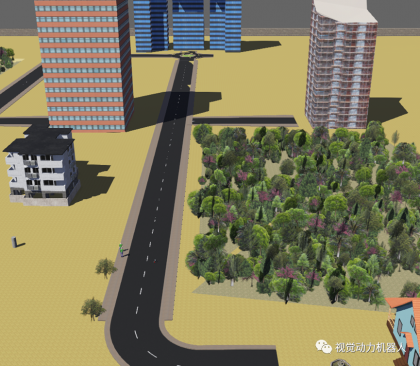
webots软件构建的我的校园模拟场景

图片
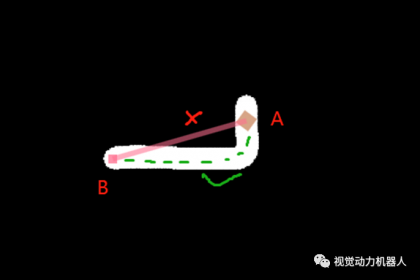
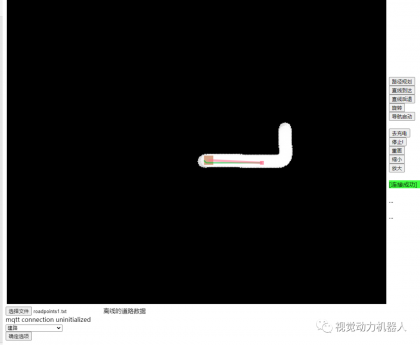
通过采集绝对位置获取道路上的信息并构建黑白栅格地图(白色代表可行使的道路,黑色代表不能行驶的道路)。
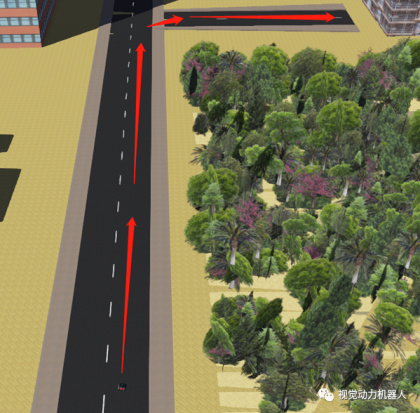
通过使机器人按图中箭头行驶或者手持定位仪器构建图中的道路。此过程中并不关心道路上的地标、人群、车辆等信息。仅关心这条道路是一条可通行的可用于规划路径的道路。
如从A点到B点,在没有路网图的情况下,机器人的路径规划可能是图中错误的方式,但有了道路网络图,则不用担心此路不通的情况了。
 图片
图片
构建环境
采用webots软件构建‘我的校园’模拟场景
 图片
图片
场景中含有简单的白油漆马路,无红绿交通灯,主要是非道路中的园区、厂区、农田、填埋场等场景。
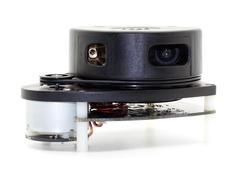
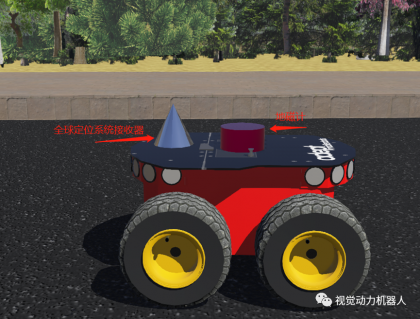
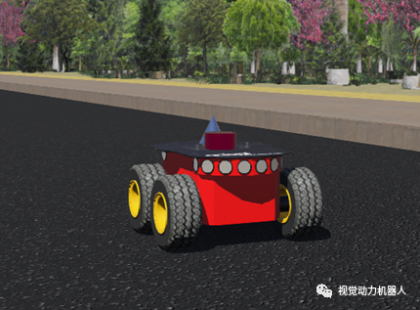
在机器人小车上安装IMU和GPS传感器,使用现成的pioneer3四轮小车作为车体。
 图片
图片
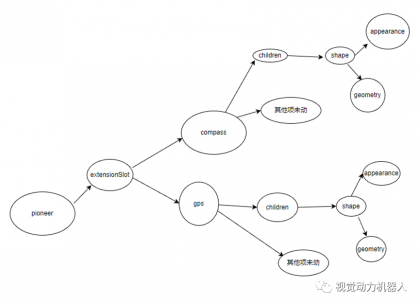
webots的结构树
该工程仿真环境的完整搭建这里不再做详细说明,可以关注本号,回复‘webots’获取工程,工程名叫 ‘myschoolyard’.
编写代码
webots端使用python编写代码,代码分为两部分。
采集建路图部分--gpsCollect_controller.Py
导航部分---navigation.py
网页交互端采用js+html 编写,实现建图和交互,包括下发目标点和规划路径的操作。
 图片
图片
webots端 gpscontroler.py代码如下:
"""gpsCollect_controller controller."""
You may need to import some classes of the controller module. Ex:
from controller import Robot, Motor, DistanceSensor
from controller import Robot
from controller import GPS
from math import atan2
import cv2
import numpy as np
import argparse
import os
import sys
import datetime
from paho.mqtt import client as mqtt_client
import random
import time
import threading
import json
import math
from pynput import keyboard
MQTT相关
broker = '127.0.0.1'
broker = 'www.woyilian.com'
port = 1883
camera_topic = "/camera/collect" #保留
roads_topic = "/roads/collect" #保留
client_id = 'python-mqtt-{}'.format(random.randint(0, 1000))
控制指令topic
cmd_vel_topic = "/cmd/vel"
create the Robot instance.
robot = Robot()
get the time step of the current world.
timestep = int(robot.getBasicTimeStep())
front_left_wheel = robot.getDevice('front left wheel')
front_right_wheel = robot.getDevice('front right wheel')
back_left_wheel = robot.getDevice('back left wheel')
back_right_wheel = robot.getDevice('back right wheel')
gps = robot.getDevice("gps")
if gps.getCoordinateSystem() == GPS.WGS84:
print("GPS is using 'WGS84' coordinates system")
gps.enable(timestep)
compass = robot.getDevice('compass')
compass.enable(timestep)
gps.disable()
设置初始位置
front_left_wheel.setPosition(float('inf'))
front_right_wheel.setPosition(float('inf'))
back_left_wheel.setPosition(float('inf'))
back_right_wheel.setPosition(float('inf'))
front_left_wheel.setVelocity(0.0)
front_right_wheel.setVelocity(0.0)
back_left_wheel.setVelocity(0.0)
back_right_wheel.setVelocity(0.0)
You should insert a getDevice-like function in order to get the
instance of a device of the robot. Something like:
motor = robot.getDevice('motorname')
ds = robot.getDevice('dsname')
ds.enable(timestep)
vr =0
vl =0
vel =0.4
ang =0.1
start_flg =0
'''
↑
← ↓ →
K—停止
↑←↓→—前、左、后、右
q/z : 最大速度增加/减少10%
w/x : 仅线性速度增加/减少10%
e/c : 仅角速度增加/减少10%
'''
def conver2wheel(v,w):
global vr,vl
vr = (2v + w10)/2
vl = (2v - w10)/2
def on_press(key):
print(str(key))
global vel,ang,start_flg
if(str(key) =="Key.up"):
前进
    start_flg =1
    ang = 0.0
    conver2wheel(vel,0)
elif (str(key) =="Key.right"):
ang = -0.1
conver2wheel(vel/2,ang)
elif (str(key) =="Key.left"):
ang = 0.1
conver2wheel(vel/2,ang)
elif (str(key) =="Key.down"):
conver2wheel(0,0)
start_flg =0
elif (str(key) =="'w'"):
if vel <10.0:
vel = vel +0.1
conver2wheel(vel,0)
elif (str(key) =="'x'"):
if(vel>0.1):
vel = vel -0.1
conver2wheel(vel,0)
elif (str(key) =="'e'"):
if ang <1.0:
ang = ang+0.1
conver2wheel(vel,ang)
elif (str(key) =="'c'"):
if ang < 1.0:
ang = ang + 0.1
conver2wheel(vel,ang)
print("vel:"+str(vel))
front_left_wheel.setVelocity(vl)
front_right_wheel.setVelocity(vr)
back_left_wheel.setVelocity(vl)
back_right_wheel.setVelocity(vr)
def loop():
global vel,ang,start_flg
last_time =0
last_x =0
last_y =0
init_x =800/2
init_y =800/2
pix_di =0
start_x =0
start_y =0
first_flg =0
g_img =None
g_img = np.ones((800,800), np.uint8)
g_img.fill(0)
while robot.step(timestep) != -1:
    x=gps.getValues()[0]
    y=gps.getValues()[1]
if(first_flg ==0):
first_flg =1
last_x = x
last_y = y
continue
获取速度,单位m/s
    gps.getSpeed()

    north = compass.getValues()
    angle = atan2(north[1], north[0])
print(str(angle) + ' ')
判断是否行驶超过3m
dis = math.pow(x-last_x,2) + math.pow(y-last_y,2)if(dis >= (3*3)):
print(str(x) + ' '+ str(y))
        rad = atan2(y-last_y, x-last_x)
        img =None
        img = np.ones((800,800), np.uint8)
        img.fill(0)
        pix_di = math.sqrt(dis)/0.5;
        start_x = (init_x +  (pix_di*math.cos(rad)/1.4142135))*100/100
        start_y = (init_y +  (pix_di*math.sin(rad)/1.4142135))*100/100
        print(str(init_x)+" "+str(init_y)+" "+str(start_x)+" "+str(start_y))
        cv2.line(img,(int(init_x),int(init_y)), (int(start_x),int(start_y)),(255),15)
        cv2.line(g_img,(int(init_x),int(init_y)), (int(start_x),int(start_y)),(255),15)
找到临时的道路为白色点位
idx = cv2.findNonZero( img )cv2.imshow('img', img)
cv2.waitKey(500)
        byteArr = bytearray(idx)#1xN维的数据
        result = client.publish(roads_topic,byteArr,0)
        last_time = t
result: [0, 1]
status = result[0]if status == 0:
print(f"Send to topic {roads_topic}")
else:
print(f"Failed to send message to topic {roads_topic}")
cv2.imwrite('img.png', g_img)
last_x = x
last_y = y
init_x = start_x
init_y = start_y
pass
作为子线程开启
th = threading.Thread(target=loop)
th.setDaemon(True)
th.start()
Enter here exit cleanup code.
with keyboard.Listener(on_press=on_press) as lsn:
lsn.join()
定义mqtt的client
client = mqtt_client.Client(client_id)
last_time =0
def on_connect(client, userdata, flags, rc):
print("Connected with result code "+str(rc))
client.subscribe("test")
def on_message(client, userdata, msg):
print(msg.topic+" "+msg.payload.decode("utf-8"))暂时保留
def publish(client):
global last_time
global detect_ok
global resultImg
msg_count = 0
while True:
if name == 'main':
是否保存为AVI视频
if args.savevideo:
out = cv2.VideoWriter("road" + ".avi", cv2.VideoWriter_fourcc('M','J','P','G'),10,(512,256))
print("camera connected!")
client.on_connect = on_connect
client.on_message = on_message
client.connect(broker, port, 60)
publish(client)
订阅主题
client.subscribe(cmd_vel_topic)
client.loop_forever()
代码包含任务有:
采集全局定位信息,以米为单位转化为道路地图坐标;
生成二值化黑白地图;
生成坐标对应表;
生成道路坐标点;
通过mQTT 主题发布道路点;
上述代码执行完后,会生成三个文件。分别是:
Index.csv,用预保存全局定位坐标和转换后的坐标索引表;
Map.png则是生成的地图,可以直接用于路径规划;
Roadpoints.Csv是所有的路上的白点坐标。保存了路径点位,可用于web离线建图。

全局路径规划和航点生成
Webots 仿真运行代码 完成任务有:
全局定位采集和转换并发布到topic:/map/xy ,同时 网页监听查看定位信息;
完成规划的航点接收并完成导航;
完成导航决策【无避障情况】。
Easymqos_AStar_planning 作为一个单独的节点完成路径规划和航点发布。
接收起始点和目标点完成路径规划并发布至主题,/path/planning
 图片
图片
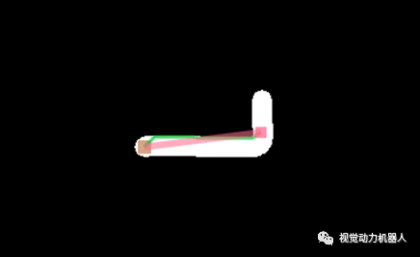
上图绿线部分是A*算法生成的路径。
Webos仿真软件作为底盘执行器和数据采集器。
网页端查看地图。
 图片
图片
 图片
图片
视频:
https://mp.weixin.qq.com/s/J1Z0HE7ngroc2LWw-8ajiw
工程和代码请关注公众号后回复 webots 获取。